
I've read that creating a blog using a framework is the new "Hello world" for developers. I would argue that creating a todo list is more prevelent. Either way I haven't added my "hello world" yet so here it is.
I was inspired by this post by Jon Evans Youtube video where he basically created a blog using ember-cli after having a few drinks. Jon's video was originally inspired by Tom Dale's original "Building an Ember.js Application Video". Tom's video is a little outdated so check out Jon's first.
If you like to follow along with the code the source is here. I have a working demo on Firebase. Make sure to login at the top with your twitter information so you can edit/add new posts.
Getting Started
Let's first generate all our files needed and do some basic configuration. We'll be using ember-cli and we'll assume that you've already installed it. If not check out the ember-cli installation guide here.
$ ember new MyCoolBlog
Easy enough now let's add bootstrap.
$ cd MyCoolBlog
$ bower install --save-dev bootstrap
We'll need to add bootstrap to our Brocfile.js so it will be added to our output files.
//Brocfile.js
...
app.import('bower_components/bootstrap/dist/css/bootstrap.css');
module.exports = app.toTree();
While testing it's important to setup our content Security Policy. I won't get into to it to much however it basically is an extra security measure beyond what your web platform offers by default. For now we'll assume we are safe. We'll need to edit the config/environment.js file and add these lines below the APP section.
// config/environment.js
...
},
       contentSecurityPolicy: {
              'default-src': "'none'",
              'script-src': "'self' 'unsafe-inline' 'unsafe-eval'",
              'font-src': "'self'",
              'connect-src': "'self'",
              'img-src': "'self'",
              'report-uri':"'localhost'",
              'style-src': "'self' 'unsafe-inline'",
              'frame-src': "'none'"
            }
Next let's generate some scaffolding for our application
$ ember g resource posts
This will create the model post.js, the unit test, the routes for posts.js and the template for posts.
Next let's create the templates and controllers needed. Ember-cli will create the directories and files needed.
$ ember g template posts/edit
$ ember g template posts/new
$ ember g controller posts/new
$ ember g controller posts/edit
$ ember g controller application
$ ember g helper format-date
$ ember g model post
$ ember g route posts
$ ember g route application
$ ember g route index
Of course we can create these all manually. This just makes it a little easier and we don't have to memorize all the boiler plate code.
We'll be using a few helpers later on. We'll go ahead and get these ready now.
$ npm install ember-cli-showdown --save-dev
$ npm install moment --save-dev
$ bower install moment --save-dev
Moment is a date library and ember-cli-showdown is a addon to do markdown. We'll take about this more in later sections.
We are going to use Firebase for our data store. Let's install the neccessary files.
$ ember g adapter application
$ ember g initializer auth
$ npm install --save-dev firebase
$ npm install -g firebase-tools
# npm install --save-dev emberfire
$ ember g emberfire
When I ran the npm install I got a message asking me what version of ember I wanted to use. I just chose the current one it recommended. Also note on previous versions of ember-cli I had to move data from the bower_components directory to vendor, that is no longer neccessary.
Router
Lets create a few routes. We want the urls to be /posts, /posts/1, and /posts/new. To create a group of routes we will create a resource (this may eventually be deprecated but for now lets use it). We'll need to edit the router.js.
// app/router.js
        this.resource("posts", function() {
                this.route("new");
                this.route("edit",{
                        path: ":post_id"
                });
        });
The ':post_id' is called a dynamic segment. This will look for the post model id and use that as a part of the route in the url.
Helpers
Sometimes you might want to reuse certain HTML in your templates or you might want to format it. Helpers can do this. Earlier we generated a helper file called format-date. Note that it has a dash in its name. This is neccessary for all ember-cli helpers.
The first helper allows us to transform text into markdown. Markdown is intended to make it easy to write for the web. We already installed the 'ember-cli-showdown' module earlier so we should be all set to use that. When we create our templates we'll be using this helper.
The second helper is format-date. We'll simply create a new variable formatDate and have it return a date that is formatted from now.
// helpers/format-date.js
import Ember from 'ember';


var formatDate = Ember.Handlebars.makeBoundHelper(function(date) {
        return moment(date).fromNow();
});


export default formatDate;
Models
We'll keep the model fairly simple. We'll have a title, description, author and date.
// models/post.js
import DS from 'ember-data';

export default DS.Model.extend({


        title: DS.attr('string'),
        description: DS.attr('string'),
        author: DS.attr('string'),
        date: DS.attr('date')

});
Firebase Model
Since we are using the ember-data data store we have a wide variety of adapters we can use. We could generate an http-mock server with ember-cli and use the REST adapter. Or we could use the ember fixture data adapter. Or we could even roll our own to connect to our backend server we setup elsewhere. For the sake of simplicity and because I've worked with it before let's use Firebase. Which just recently got bought by Google.
I've written about Firebase previously here, here and here. Please feel free to check out some of the other tutorials I've created.
Since we are using ember-data we'll need to setup the Firebase adapter. After this is setup we can manipulate the data in the model store and it will automatically get update in the Firebase server and be persisted.
// adapters/application.js
import DS from 'ember-data';

export default DS.FirebaseAdapter.extend({
                firebase: new window.Firebase('https://<your firebsae>.firebaseio.com/')
});
We've already setup the model earlier so that's just about it. Make sure to replace the url with your own Firebase URL environment setup.
Firebase Simple Login Authentication
Since we are using Firebase we might as well use their authentication service. Once again for this tutorial we'll just require anyone that wants to submit a blog post to be authenticated with Firebase through twitter.
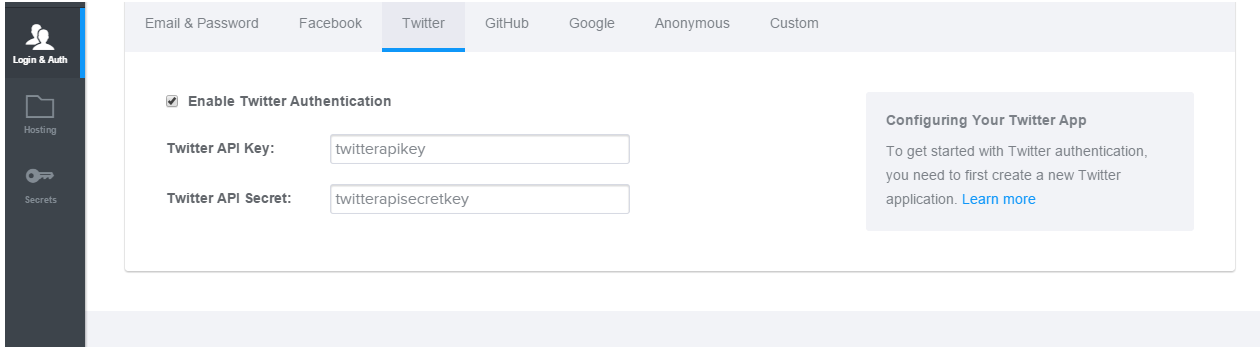
First things first is you must setup the login authentication in Firebase. I won't get into too much detail with this however you essentially need to go to the Firebase dashboard and click on the 'Login & Auth' tab and fill out the Twitter API Key and API Secret. You'll need to get these keys from your twitter account. Check out Firebase's documenation for more info.
After you have everything setup on Firebase then you'll need to create an initializer and inject it into all your controllers and routes. This auth object now can be accessed anywhere.
// initializers/auth.js
import Ember from 'ember';

var Ref = new window.Firebase("https://<your firebase>.firebaseio.com/");


var auth = Ember.Object.extend({
  authed: false,
  username: '',
  init: function() {
    this.authClient = new window.FirebaseSimpleLogin(Ref, function(error, twitterUser) {
      if (error) {
        alert('Authentication failed: ' + error);
      } else if (twitterUser) {
        this.set('authed', true);
        this.set('username',twitterUser.username);
      } else {
        this.set('authed', false);
      }
    }.bind(this));
  },

  logout: function() {
    this.authClient.logout();
        this.set('authed', false);
  }
});


export default {
  name: 'Auth',

  initialize: function( container, app ) {
        app.register('auth:main', auth, {singleton: true});
        app.inject('controller', 'auth', 'auth:main');
        app.inject('route', 'auth', 'auth:main');

  }
There is a lot to go over here. Basically an initializer is a great way to organize your dependency injection while giving access to the ember container. We also setup a variable named auth that we can use to help keep track if a user is logged in or out. The auth object is an Ember object that creates the conection to the Firebase simple login service. (Eventually the FirebaseRef.auth will be deprecated for the newer authWithCustomToken. For now we will stick with what we have)
The last thing we need to do is setup a really simple security rule in Firebase. Since we can't trust user input we'll make it so only logged in users can write to the database. This will needed to be edited in the 'Security & Rules' tab in the Firebase Dashboard.
// firebase rules
{
    "rules": {
        ".read": true,
        ".write": "auth != null"
    }
}
Auth is a special variable that is used to determine if a user is authenticated or not.
Routes
We'll need to make sure that our routes have access to our model. Let's connect that up.
// routes/posts.js
import Ember from 'ember';

export default Ember.Route.extend({
        model: function() {
                return this.store.find('post');
        }

});
This is fairly simple. We are just telling posts that they have access to the post model. This way our posts template will have access to our post model.
Templates
Since we are using bootstrap we might as well create a basic navigation bar at the top of every page. Add the following lines to the application.hbs.
// templates/application.hbs
<nav class="navbar navbar-inverse navbar-fixed-top">
        <div class="container-fluid">
                <div class="navbar-header" href="#">
                        <a class="navbar-brand" href="#">Blog</a>
                </div>
                <ul class="nav navbar-nav">
                        <li>{{#link-to 'posts'}}Posts{{/link-to}}</li>
                        {{#if auth.authed}}
                        <li>{{#link-to 'posts.new'}}Add New Post{{/link-to}}</li>
                        {{/if}}
                </ul>
                <ul class="nav navbar-nav navbar-right">
                        {{#unless auth.authed}}
                        <li><a href="#" {{action 'login' on='click'}}>Login</a></li>
                        {{else}}
                        <li><a href="#" {{action 'logout' on='click'}}>Logout</a></li>
                        {{/unless}}
                </ul>
        </div>
</nav>
{{outlet}}
The link-to helpers will direct the user to the posts and the posts/new handlebars templates.
The login and logout buttons will be used to help the user login or logout of the application. We've create actions for these buttons which will implement later in our application controller.
The '#unless' handlebars statement is just a conditional that will only execute if the 'auth.authed' is not true. The auth variable being from the Firebase object we created in the last section.
Next we'll create a posts template that will display all the posts that are created.
// templates/posts.hbs

<div class="row">
        <div class="col-md-4">
                <h1>Posts</h1>
                {{#each p in model}}
                <br>{{#link-to 'posts.edit' p.id}} {{p.title}}{{/link-to}}
                {{/each}}
        </div>
                {{outlet}}
</div>
~
In our posts.hbs template we'll add a {{#each}} as a way to iterate through our handlebars template and display each title for every blog post (this should be connected via our routes we setup earlier). Note that in the link-to helper we had to provide it the route 'posts.edit' as well as the id for the model. The {{outlet}} will display the embedded route, either the posts.edit or posts.new after it is clicked.
The 'posts/edit.hbs' file is where want to display the full blog post including the title, description, author and date. We want to give an option to edit the post as well. We'll use a 'isEditing' variable to keep track if the edit button is pressed or not.
// templates/posts/edit.hbs
{{#if isEditing }}
<div class="col-md-4">
        <h2>Edit Post</h2>

        <form {{action 'save' on="submit"}}>
        <dl>
        <dt>Title:<br> {{textarea value=model.title cols="40" rows="1"}}</dt>
        <dt>Description:<br> {{textarea value=model.description cols="40" rows="6"}}</dt>
        </dl>
        <div class="row">
                <button type="submit" class="btn btn-primary">Done</button>
                </form>

                <button type="delete" class="btn btn-primary" {{action 'del' on='click'}}>Destroy</button>
        </div>
</div>
{{/if}}
<div class="col-md-4">
        <h1>{{model.title}}</h1>
        <h3>{{showdown-addon model.description}}</h3>
        <h5>-{{model.author}}</h5>
        <h5>{{format-date model.date}}</h5>
        <form {{action 'edit' on="click"}}>
        {{#if auth.authed}}
        <button type="submit" class="bt btn-primary">Edit</button>
        {{/if}}
        </form>
</div>
The first {{if}} section shows what will be displayed if isEditing is true. This will show two textarea boxes showing the model information. At the same time all the information for the post will show on the right hand side side so you can do some live editing of the blog. If your logged in that is.
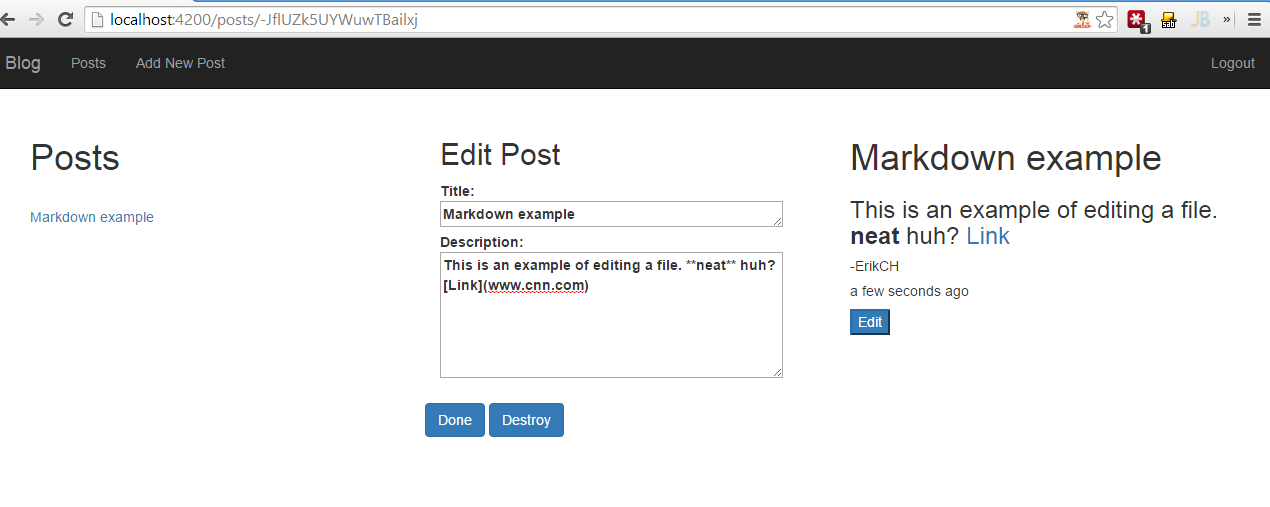
This template also is using our two helpers we've created. '{{showdown-addon model.description}}' will convert the text displayed to markdown. '{{format-date model.date}}' will format the date shown. It will look like this
The last template we want to create is the posts/new.hbs. This will simply allow us to add a new post.
//posts/new.hbs
<div class="col-md-4">
        <h1>New Post</h1>

        <form {{action 'save' on="submit"}}>

        <dl>
        <dt>Title:<br> {{textarea value=title cols="80" rows="1"}}</dt>
        <dt>Description:<br> {{textarea value=description cols="80" rows="6"}}</dt>
        </dl>
        <button type="submit" class="btn btn-primary">Add</button>
        </form>
<div class="col-md-4">
Once again we create two text area boxes and we created a simple button. The 'save' action will be sent over to the controller.
FYI we could probably refactor some of this code as a partial template and share it
between the new and edit templates. We'll leave that for an excersize to do later.
Controllers
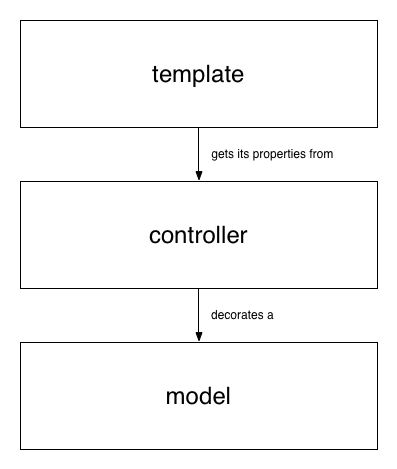
The last part of our application we'll need to complete is our controllers. Rember their is a very close relationship between the template, controller and model. Templates get their properties from controllers which decorate models
We'll need three different controllers for our application. The application.js controller will be used to capture the login and logout actions from the application.hbs template. We'll be using the inject auth object to complete this.
 // controllers/application.js
 import Ember from 'ember';

export default Ember.Controller.extend({
        needs: ['posts/edit'],
        actions: {
        login: function() {

        var route = this;
        (this.get('auth').authClient.login('twitter')).then(function(){
                this.get('auth').set('authed', true);
                return route.transitionTo('posts');
                }


                );
        },
        logout: function() {
                this.get('auth').logout();
                this.set('controllers.posts/edit.isEditing', false);
                this.transitionToRoute('posts');

        }
        }

});
First thing you'll see is we used 'needs'. This is just a way we can inject the 'posts/edit' controller into application controller. We'll need this so we can set the isEditing flag to false after we logout.
'(this.get('auth').authClient.login('twitter')).then' is a promise that will return when it's successful. We set the authed variable to 'true' so we can use this in our templates to verify that a user is really logged in. (Of course with the nature of a single page application we can never trust the user input. That's why as an extra precaution we used the Firebase Rules earlier so that any editing with a user that is not authenticated will create a 'Permission denied'
The next controller is posts/edit.js. Here we define the three actions earlier we had in our posts/edit templates.
// controllers/posts/edit.js
import Ember from 'ember';

export default Ember.Controller.extend({

actions: {
        save: function() {
                var d = this.get('model');
                d.set("date",new Date());
                d.save();
                this.set('isEditing', false);

        },
        del: function() {
                this.get('model').deleteRecord();
                this.transitionToRoute('posts');
                this.get('model').save();
                this.set('isEditing', false);
        },
        edit: function() {
        this.set('isEditing', true);
        }
}


});
~
Since we are using ember-data we can delete and edit our data store really easily.
The posts/new.js is our last controller. In this controller we defined the save action. We create a new record and insert the title and description from the template. We create a new date object as the date and we use the auth object again and retrieve the twitter username as the author.
//controllers/posts/new.js
import Ember from 'ember';

export default Ember.Controller.extend({
actions: {
        save: function() {
                var title = this.get('title');
                var description= this.get('description');
                var author= this.get('auth').username;
                var date = new Date();
                if(!title.trim()) {return; } //empty string

                var post = this.store.createRecord('post', {
                        title:title,
                        description:description,
                        author:author,
                        date:date

                });
                this.set('title','');
                this.set('description','');
                this.set('author','');
                post.save();
                this.transitionToRoute('posts');

        }
}
});
Deploy With Firebase Hosting
To deploy with Firebase is really easy. Earlier we installed the Firebase tools (npm install -g firebase-tools). Now we just need to initialize the directory, point it toward our dist folder and deploy
$ cd <folder where your ember-cli project is>
$ firebase init
At this point a firebase.json file will be created. Simply point public to the dist folder.
UPDATE
Brendan OHara pointed out in the comments that I needed to add a rewrite rule so that we could route anywhere in the app. Thanks!
//firebase.json
{
  "firebase": "blogexample",
  "public": "dist/",
  "ignore": [
    "firebase.json",
    "**/.*",
    "**/node_modules/**"
  ],
  "rewrites": [ {
  "source": "**",
  "destination": "/index.html"
}]
}
Now we just need to build the final production application and deploy it
$ ember build -prod
$ firebase deploy
Now you just need to go to the URL given to you by Firebase. You can see my deployed app here
Future?
There is so much more we could do with this blog. The first is to add comments, redo our model and add more relationships. The security right now is not very good. Creating better security roles would be a good idea. I'll look into this more in future posts.
Please leave a comment below if you have any questions, or if I missed anything. I used ember-cli version 0.1.5, handlebars 1.3.0, ember-data 1.0.0-beta.12 and ember 1.8.1.