
I realized recently that I've never written a tutorial on Ember CLI. If you're new to Ember you should start here to get an overview of how this tool works and how you can get started with Ember.
In this tutorial we'll go over what Ember CLI is, and how to install it. Then we'll go over some basic commands and generate a project. After this we'll take a look at asset compilation, dependencies and finally upgrading. If you need any more information on any topic covered in this tutorial you can always check out the official Ember CLI User-Guid.
What Is Ember CLI?
So what is Ember CLI? Simply put it's a command line utility that is used to create Ember.js applications. It's extensible via an addon system and it uses Broccoli as it's asset pipeline. It minifies all your JS & CSS, it supports LESS, and Sass and it even supports ES6 syntax. It's everything you need to get started.
This is good news because in the past there was many different ways of putting together an Ember project. Some people used Yeomen while others used Grunt or Gulp. The now deprecated starter kit wasn't simple and upgrading was a pain. When Ember CLI came out it made everything a lot easier, especially for beginners. So let's get started
Installation and Setup
In a previous blog post I went over how to install iojs using the Node Versioning Manager or nvm for short. I recommend using nvm because it's really easy to use and it works great with Mac or Linux. I've heard there is a version for windows although I don't know how well it works. For the installation part of this tutorial I'll assume you're on a Mac or Linux distribution.
We'll need to install nvm and we can use curl to do this. Open up a command prompt and type the command below. (If you're on a Mac you may want to install homebrew. It's a great utility that makes it really easy to install packages to your system)
$ curl -o- https://raw.githubusercontent.com/creationix/nvm/v0.25.4/install.sh | bash
Then we can install the latest version of node by using this command
$ nvm install node
If all goes well you should now have a version of node and npm on your system. If you're not familiar npm is a package manager that we can use to install the latest version of ember-cli.
Install it using the following command.
$ npm install -g ember-cli
This process might take a few minutes. It will pull down all the dependencies you need and it will make ember-cli global so it can be ran anywhere.
You'll need to install Bower another package manager for your front-end dependencies.
$ npm install -g bower
After the install is done you can check to make sure it's working.
$ ember -v
At anytime you can look at the list of commands by just typing in ember.
$ ember
If you get an error about watchman you can ignore it. Although if you really want you can install it. On a mac you can use homebrew.
$ brew install watchman
On Linux you'll probably have to install it from source. You can use these directions. To get it working on my Ubuntu box I had to apt-get build-essential, python2.7-dev and automake.
Basic Commands
I'm assuming you have everything installed. If not check the previous section and see what you missed. Let's begin by creating a new project!
$ ember new MyNewProject
You should see several new create statements and a blinking cursor on "Installing packages for tooling via npm...". This will take a few minutes.
After this process is done you'll have the basic application structure created.
ember server
We have an empty project. We can use this ember server command to start a server and see how our project looks.
$ cd MyNewProject
$ ember server
You should see this screen if you bring up http://localhost:4200.
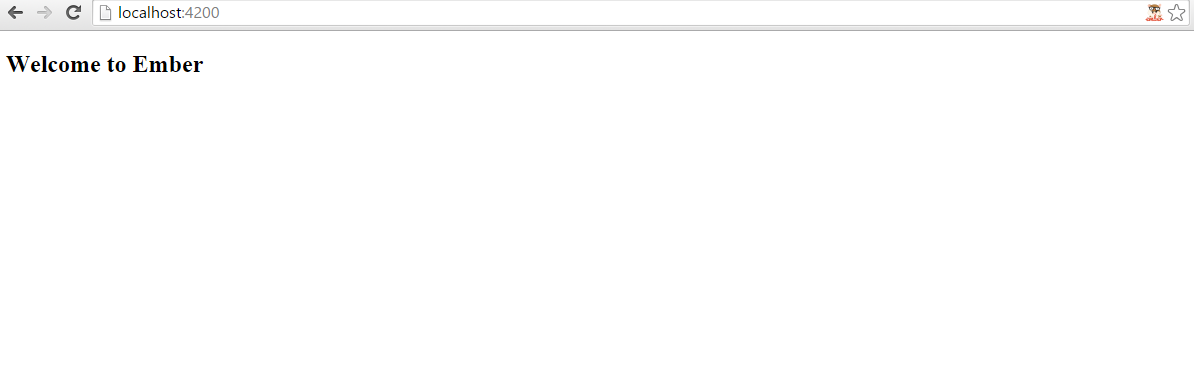
There isn't much to look at right now. Keep in mind that you can run the server in one tab and make changes in another and the server will automatically reload after any file change. This is done via LiveReload. It's nice its built in.
ember generate
After the structure of the application is created we'll need to add any number of routes, models, components, and so on. We can use the generate command to create these files.
Let's add a new route.
$ ember generate route hellothere
This will create the following files.
app/routes/hellothere.js
app/templates/hellothere.hbs
tests/unit/routes/hellothere-test.js
It will even update the router for us. This is really useful, you won't need to memorize all the syntax needed for each file. Although you should be familiar with naming conventions that the CLI uses. We won't cover that here.
Essentially you can use any number of generators by using the ember generate
$ ember g template mytemplate
It's a little quicker.
Asset Compilation
To add images, fonts and other assets you can place them in the public/assets directory in your project. For CSS you'll need to create or use the existing file in your app/styles folder.
Minifying
Minification is enabled by default in your production environment but can be disabled in your ember-cli-build.js file if needed. This file is located in the root of your project. It is used with broccoli to import files and change default settings.
If you needed to disable minifying you can add this to your ember-cli-build.js file.
// ember-cli-build.js
minifyCSS: {
  enabled: false
},
minifyJS: {
  enabled: false
}
Adding a CSS file
You can add in CSS files with bower fairly easily. Bower, as I mentioned earlier, is a front-end package manager. Let's say we wanted to add in flexbox grid.
$ bower install flexboxgrid --save
After the installation is complete you need to update the ember-clid-build.js file.
// ember-cli-build.js
...
app.import('bower_components/flexboxgrid/css/index.min.css');
return app.toTree();
};
That's it! This is also how you add in your JS libraries.
Dependencies
You can use Bower to install your JavaScript dependencies. If you look at the bower.json file you'll see everything installed. One thing to keep in mind is Non-AMD Assets and AMD Assets.
Non-AMD Assets
When importing JavaScript files some will be in an AMD format and some wont. AMD is a special specification used to define APIs for code modules and dependencies. If your JS files are not in that format you can simply import them into your Ember project like this.
// ember-cli-build.js
...
app.import('bower_components/moment/moment.js');
This will add a moment global variable into your project that you can be used anywhere. Remember to use the /* global MY_GLOBAL */ comment at the top of your JS files to keep JSHint happy. We'll discuss JSHint in a future tutorial.
AMD Assets
On the other hand AMD assets are imported the same way although you have more flexibility to list which modules you want to export.
// ember-cli-build.js
...
 app.import('bower_components/ic-ajax/dist/named-amd/main.js', {
    exports: {
      'ic-ajax': [
        'default',
        'defineFixture',
        'lookupFixture',
        'raw',
        'request',
      ]
   }
 });
Once again you'll need to look at the documentation of the JS file you're importing to get an idea of what you should export.
Upgrading
Ember is moving really fast. Some people don't like that. With that said it's nice you can upgrade your project though at any time.
To do that follow these steps.
$ npm uninstall -g ember-cli
$ npm cache clean
$ bower cache clean
$ npm install -g ember-cli@X.X.X
$ rm -rf node_modules bower_components dist tmp
$ npm install ember-cli@X.X.X --save-dev
$ npm install
$ bower install
$ ember init
(X.X.X being the version of Ember CLI you want to upgrade too)
That's what you have to do. You might want to make sure you have a backup of your application before you do this. Hopefully you're using some sort of version control system like git and have everything saved.
When running ember init be careful not to overwrite anything important. If you're upgrading from a significantly older version of Ember be prepared to deal with many deprecation warnings. This is easy enough to fix, although it might take a while.
Summary
In this post we went over how to install Ember CLI, creating a new project and using generators. Then we took a look at asset compilation and dependencies. Finally we ended with directions on upgrading an older ember project.
There is a lot more to go over here. We haven't even touched testing, deployments, or Ember data. I'll save those topics for next time.
Questions? Leave a comment below!
Image Credit Jay Phelps