
![]() Socket.IO enables real-time event-based communication. What that means is that we can communicate to the server from the client and in return the server can talk back to the client. Socket.IO uses WebSockets when it can and has failovers if the browser does not support it. It's fairly simple to setup and works on every platform, browser or device and it's fast. Learning WebSockets, io.js and Socket.IO all at the same time is not easy. So we'll explore a few basics of each to begin with.
Socket.IO enables real-time event-based communication. What that means is that we can communicate to the server from the client and in return the server can talk back to the client. Socket.IO uses WebSockets when it can and has failovers if the browser does not support it. It's fairly simple to setup and works on every platform, browser or device and it's fast. Learning WebSockets, io.js and Socket.IO all at the same time is not easy. So we'll explore a few basics of each to begin with.
In this tutorial we'll cover getting a basic Express server running. Installing and configuring Socket.IO. And a few basics of Socket.IO communications.
I created a newer updated version of this tutorial, that uses Node instead of io.js! Check it out here!
Getting Started
First we'll assume you have io.js and npm installed. If not I would recommend using NVM to install it. Check out my getting started with io.js guide for more information. For this tutorial we'll be using io.js version 1.5.0, Express 4.12 and socket.io 1.3.5. If you’re more of a Node fan feel free to use that instead. It should work the same.
Let's create a blank project to begin with.
$ npm init
This will ask you a set of questions. You don't have to worry too much about them now, just press enter through them. This will create the package.json file. This file holds all the metadata related to the project.
We need to install Express and Socket.IO and save them to our package file for later.
$ npm install socket.io express --save
That should be it for the server side. Just for fun we'll add some jquery to the client side. We'll use one more tool to make this a little easier. Bower is a package manager for the web essentially. It's an easy tool to add in frameworks, libraries and utilities into your projects. It uses a bower.json file similar to the package.json file. To get started let's install it and initialize the bower file.
$ npm install -g bower
$ bower init
This will install bower and create an empty bower.json file.
$ bower install jquery --save
This will save all the jquery files into a new 'bower_components' folder. We'll be referencing this later when we create the index.html file.
Server Hello World
We'll need to create a new file that io.js will run. We'll be using Express as our web framework of choice. If you want to learn more about Express check out my getting started guide.
Create a new file called app.js.
// app.js
var express = require('express');
var app = express();
var server = require('http').createServer(app);
var io = require('socket.io')(server);

app.use(express.static(__dirname + '/bower_components'));
app.get('/', function(req, res,next) {
    res.sendFile(__dirname + '/index.html');
});

server.listen(4200);
Lots of things are happening in this file. First we are requiring Express, and creating a new server. We then are requiring Socket.IO. We are setting the static folder to '/bower_components' since we are using bower to serve up the JQuery.
App.get routes http requests to the specified path with a specific call back function. The 'res' object represents the HTTP response that an Express app sends when it gets a request. The 'sendFile' just sends the file at the specific path. We'll be creating the index.html in a second. 'server.listen' will open a port and listen for requests coming in.
Create a new 'index.html' file.
<!doctype html>
<html lang="en">
	<head>

    </head>
    <body>
    	<h1>Hello World!</h1>
        <div id="future"></div>
        <form id="form" id="chat_form">
    		<input id="chat_input" type="text">
    		<input type="submit" value="Send">
		</form>
     	<script src="https://code.jquery.com/jquery-1.10.2.js"></script>
        <script src="/socket.io/socket.io.js"></script>
    </body>
</html>
We can fire up the server to make sure everything is working.
$ iojs app.js
If we open a browser at 'localhost:4200' we should see 'Hello World!' and an input form.
Client Socket Emit
First thing we want to do is see if we can get the client to connect to the server with Socket.IO and have it respond in the console.
First we'll edit our index.html file.
// index.html
...
<script>
    var socket = io.connect('http://localhost:4200');
	socket.on('connect', function(data) {
    	socket.emit('join', 'Hello World from client');
    });
</script>
The socket.on('connect') is an event which is fired upon a successful connection from the web browser. We then have a function callback that will send to the server the hello world message.
Let's add in the code to the server
// app.js
...
io.on('connection', function(client) {
    console.log('Client connected...');

    client.on('join', function(data) {
    	console.log(data);
    });

});
The 'io.on' is listening for connections. When it receives one it will report to the console 'client connected...'. You can then setup a number of individual events for it to listen to from the client. The 'client.on('join') will wait for a message from the client for 'join'. It will then log it to the console.
If we start up io.js again we'll see on the console the message 'Hello World from client'. Perfect.
Server Socket Emit
Let's have the server respond back with a message to the client.
// app.js
...
io.on('connection', function(client) {
    console.log('Client connected...');

    client.on('join', function(data) {
    	console.log(data);
        client.emit('messages', 'Hello from server');
    });
The client.emit will send a message back to the client that just connected with a message using 'messages'.
// index.html
...
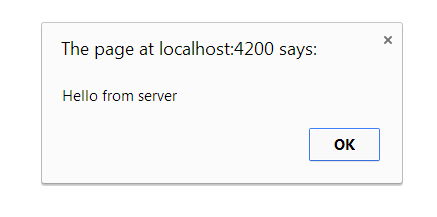
socket.on('messages', function(data) {
alert(data);
});
Now when a client connects it will send a message to the server and it will receive one back in a popup.
Server Socket Broadcast
In the previous examples we saw that we can send a message to the server. We can also send a message back to the client. What if we want to send a message to all the clients excluding the socket that started it? We can do easily with broadcast.emit .
First let's update our JavaScript in our index.html
// index.html
...
<script>
 var socket = io.connect('http://localhost:4200');
 socket.on('connect', function(data) {
    socket.emit('join', 'Hello World from client');
 });
 socket.on('broad', function(data) {
         $('#future').html(data);
   });

 $('form').submit(function(e){
     e.preventDefault();
     var message = $('#chat_input').val();
     socket.emit('messages', message);
 });
</script>
Here we added in a new JQuery '.submit' event handler which will prevent the form from submitting and instead send a message to the server with the values of the input field in 'messages'.
In addition we added a new socket event listener for 'broad' which will simply update our div with the message that was returned.
We'll need to update the server with new broadcast.
// app.js
...
io.on('connection', function(client) {
    console.log('Client connected...');

    client.on('join', function(data) {
    	console.log(data);
    });

    client.on('messages', function(data) {
           client.emit('broad', data);
           client.broadcast.emit('broad',data);
    });

});
You can see now we are listening on 'messages'. After receiving data we simply inform all other clients, excluding the socket that sent the message, the data.
If we restart the app.js file we'll see we can now send messages to all other clients when we type anything into our input box and press submit. The div under the hello world message should update.
Future
You can do a lot with this. You could create a full chat program. Or update records in the client when something changes in the server.
What do you think? Leave me a comment below!