
![]()
UPDATE 11/19/2017
There is an awesome Ember Polymer addon you can use now! Check it out!
Thanks to Jeroen for the heads up!
In my post on Ember Components I briefly mentioned something called Polymer. Polymer is a Google led API that brings Web Components to your project. If you're not familiar Web Components are essentially reusable user interface widgets created using the latest open web technology. You can create your own tags that are not in the W3C and you can implement behavior using JavaScript. Ember components is somewhat similar to Web Components.
So why would we want to use Polymer? Well one good reason is that the community has already released hundreds of components for anyone to download. It's also easy to use, and could be ported to other projects if needed.
Getting Started
There are a few Ember addons, that may or may not work and a new proof of concept one as well. For this tutorial we'll just setup everything manually.
I'll be using the code from the Interactive Design with Ember 2.0 talk at EmberConf 2015 by Bryan Langslet. It's another good video to check out.
$ ember new PolyProject
$ bower install polymer --save
$ npm install broccoli-merge-trees --save-dev
$ npm install broccoli-static-compiler --save-dev
$ npm install broccoli-vulcanize@1.0.4 --save-dev
Update 5/31/15
Vulcanize was updated recently and it's arguments changed. As long as you install via NPM 1.0.4 of broccoli-vulcanize this tutorial should work. The new Vulcanize takes new parameters that I'll update in a future post
Broccoli is your asset pipeline. Merge trees is a plugin that simply merges all your files into a single tree. Broccoli static compiler helps move files and vulcanize is used specifically with Web Components to concatenate them into one file.
Next we'll need to update the Brocfile.js file with our new settings.
Update 5/31/15
Polymer 1.0 has come out and I tried out my tutorial again. It's still working as expected. The only change you'll need to do is make sure you don't include polymer.js in the Brocfile since it doesn't exist. The code block below has been updated. webcomponents-lite.js is now just webcomponents.js as well.
Update 5/10/15
Matheus De Andrade pointed out in the comments that polymer .8 and later you'll need to remove the polymer.js from the Brocfile and change webcomponents.js to webcomponents-lite.js. FYI
// Brocfile.js

var vulcanize   = require('broccoli-vulcanize');
var pickFiles   = require('broccoli-static-compiler');
var mergeTrees  = require('broccoli-merge-trees');
var EmberApp = require('ember-cli/lib/broccoli/ember-app');

var app = new EmberApp();

var polymerVulcanize = vulcanize('app', {
  input: 'elements.html',
  output: 'assets/vulcanized.html',
  csp: true,
  inline: true,
  strip: false,
  excludes: {
    imports: ["(^data:)|(^http[s]?:)|(^\/)"],
    scripts: ["(^data:)|(^http[s]?:)|(^\/)"],
    styles: ["(^data:)|(^http[s]?:)|(^\/)"]
  }
});

var polymer = pickFiles('bower_components/', {
  srcDir: '',
  files: [
    'webcomponentsjs/webcomponents.js',
    'polymer/polymer.html'
//  'polymer/polymer.js'
  ],
  destDir: '/assets'
});

module.exports = mergeTrees([polymerVulcanize, polymer, app.toTree()]);
At the top of the file we are adding all our imports from the node modules we just installed. Then we have the normal new EmberApp lines. The polymerVulcanize object is taking everything in the app/elements.html file and processing and concatenating it into one file called vulcanized.html. We'll get back to the elements.html file later.
The polymer object is using the static-compiler to move all the polymer files in the bower_components directory into the /assets folder. Finally we export out and merge all the files.
Next we'll need to make sure that we load the polymer assets we just moved to the asset folder in the index.html
// app/index.html

...
   {{content-for 'head'}}
    <script src="assets/webcomponentsjs/webcomponents.js"></script>
    <link rel="import" href="assets/vulcanized.html">
...
Here we are simply loading the JavaScript and importing in the vulcanized.html file we created earlier.
Installing a Polymer Web Component
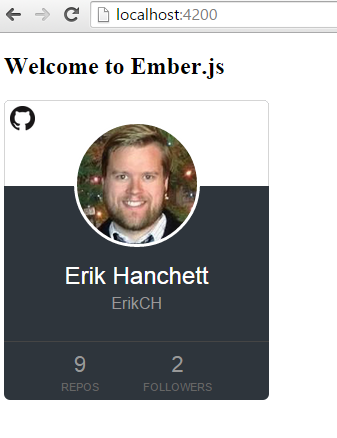
We can begin trying out a Polymer Web Component. There are hundreds to choose from. For this tutorial we'll use a simple component called github-card. This card can easily be added anywhere in your project, and all it does is show a picture of you with links to your Github repos and followers.
We can install it via bower.
$ bower install pazguille/github-card --save
// pazguille/github-card is the github url
We can use the Github repo name to save it.
Adding the Polymer Component To Ember
Next up is creating the elements.html file in the app folder.
// app/elements.html

<link rel="import" href="../bower_components/github-card/webcomponent/github-card.html">
This is where we can define all our Polymer components. Since we already installed the one we wanted to use using bower earlier, all we need to do is add this import line.
Polymer components look similar to Ember components without the curly braces when you add them to your template files. To display the Github card we'll add this line to our application.hbs file. The user is the Github profile you would like the card for.
// app/template/application.hbs
<h2 id="title">Welcome to Ember.js</h2>

<github-card user="ErikCH"></github-card>
{{outlet}}
Finally we'll run into CSP issues so let's add that to our config file after App.
// config/environment.js
...
   },
        contentSecurityPolicy: {
          'default-src': "'none'",
          'script-src': "'self' 'unsafe-inline' 'unsafe-eval'",
          'font-src': "'self'",
          'connect-src': "'self' https://api.github.com/",
          'img-src': "'self' https://avatars.githubusercontent.com",
          'report-uri':"'localhost'",
          'style-src': "'self' 'unsafe-inline'",
          'frame-src': "'none'"
        }
...
Unexpected Problem
After I did all of this I ran into a problem. The images wouldn't load when the template loaded. Apparently the github-card.html file referenced some static images in the folder it was in. The browser was expecting image files in this location bower_components/github-card/webcomponent/webcomponent/ and obviously that's never going to work.
You can fix this several ways. You could edit the github-card.html file and change the location of the image files to the current public folder and then copy the image files over there.
Just for fun I decided to edit the Brocfile.js file and add in the image files into the /asset folder like this.
// Brocfile.js
...
var polymer = pickFiles('bower_components/', {
  srcDir: '',
  files: [
    'webcomponentsjs/webcomponents.js',
    'polymer/polymer.html',
    'github-card/webcomponent/*'
  ],
  destDir: '/assets'
});
...
I added an extra line for the github-card/webcomponent. Now all the files are accessible from the asset folder.
Last thing to do is edit the github-card.html file in the webcomponent directory so the assets point to the correct folder.
// bower_components/github-card/webcomponent/github-card.html
...
 background: #fff url('/assets/github-card/webcomponent/github.png') no-repeat 5px 5px;
...
background: url('/assets/github-card/webcomponent/spinner.gif') no-repeat center center;
...
Woot! Fire up ember serve and the card should load.
Future Reading
If you want to read more about web components check out a few resources below.
- Polymer Project
- W3C Web Components
- Custom Elements
- Ember Sherpa Workshop - At 32:00 he talks about Polymer
- EmberConf 2015 Interactive Design
- Treasure Hunt Source Code from Interactive Design
Question? Leave a comment below and I'll try to help!
Image Credit to Polymer